Party Favors – Custom Drinking Cups

I had a big birthday pass recently, and I wanted to throw an epic bash worthy of my new age. Aside from just hoping that good company and good food would create lasting memories, I wanted some sort of party favor, a keepsake, for each of my guests. After hemming and hawing about possibly baking some chocolate salty balls and individually packaging them with some sort of cute label, I realized an interactive project would be more fun (and less work for me!).

Something that had gone over well at my place some years ago was when I had a “decorate your own sugar cookie” station at an Easter party. All my friends got really into customizing their own cookies, and I thought it’d be great if they could create their own takeaway gifts for my birthday. While some ideas are nice in theory, did I really think everyone needed m&ms with my face on it, or a sweatband embroidered with my name and birthday? Or would the memory of a great party simply attach itself to an object when its owner fondly remembered making it at my house? I believed the latter to be true.

I set up a simple station complete with pre-washed sippy cups with krazy straws, a couple of permanent markers, and sheets of stickers with all kinds of fun designs on them. I also had a stack of regular 16oz cups on the table, in case anyone preferred those.

The plastic cups were about $1 each at a party store. I got these particular ones because a.) they had krazy straws (which I would have bought for drinks anyway) and b.) they had a wider mouth and would be easier to wash and reuse. Another unintentional bonus was that these cups were only 12oz, and inadvertently helped people moderate their alcohol intake – not that it was a real concern in this case. But since the straw was so small, and the cup had 4oz less room than the Solo cups, people were drinking more slowly.

As predicted, the cup decorating idea was a hit! While some people created scenes and patterns on their cups, some simply wanted to write their names. Overall, my friends had a great time picking from all the stickers and creating their individualized drinking vessels, which they then used for the rest of the evening. There were no rules, and everyone enjoyed the project. Some people even decorated regular plastic cups. It was a great way to cut down on waste because no one accidentally lost or casually threw away any idle cups.

This is a great, engaging project you can certainly do for your next party with guests of all ages!

You’ll need:

  • Plastic cups with krazy straws (make sure to wash them before using!)
  • Permanent markers
  • a variety of stickers – I got skulls, owls, dinosaurs, cupcakes, fruits, and zoo animals, as well as some blingy rhinestones and stars ($1 per sheet at Target, and they had great options!)

The cups made appearances in most of the photos taken that night, and with good reason! They came out great! Lots of people even kept decorating as the night went on, and it was fun seeing them all involved – even the boys 🙂

With a little simple planning, you too can have a sippy-cup-decorating station at your next party, and drink your Creamsicle in style.

Paper Pom-Pom Garlands

I’ve been accused of random things in my life, but most often I’m lambasted for downplaying my creativity. I’ve been told that when I shrug off something that I’ve created as no big deal, it’s bizarre to other people, because not everyone’s brains work like mine. (Though to me, it wasn’t a big deal!) I think this is part of why I decided to start this blog – to show off a bit of my artwork. Don’t get me wrong, I know I have a knack for the colorful and crafty, but I have difficulty understanding how to walk the line between acknowledging my talent vs. being an unbearable braggart. (Aren’t I amazing?)

So apparently, when I casually told my mother I’d created some decorations for my birthday party, she didn’t understand that I’d handmade these garlands, as well as some other adorable adornments for my living room. I’d seen decorations like these at a party store, and had bought them on a previous occasion, but as with most things artsy, I thought, “I can make that.” So I did.

Do you remember making flowers out of tissue paper as a kid? I’m not talking the detailed flowers I learned to make using stencils from a kit my mom got me in college (does she know me or what?), but rather the accordion-folded tissue paper squares that you fluff out and attach to a pipe cleaner to make a flower… If not, that’ll be another demo for another day 🙂 I applied the same principal here – stack a bunch of papers, fold them accordion style, then fan and fluff them so you have nice pretty puffs strung together on embroidery floss (in this case).

You’ll need:

  • tissue paper
  • scissors
  • embroidery floss or any kind of string

Start off by cutting your tissue paper to whatever sized rectangles you like. I folded and cut my sheets of tissue paper in half as many times as I could until my rectangles were about 5×7. With different colors, because I do love diversity, I made my rectangles smaller – about 3×5. I didn’t measure these, so don’t stress over it. You just want all your rectangles of the same color for the same pom pom to be roughly the same size.

I decided that 12 was the magic number to where there weren’t too many sheets of paper to contend with, but enough that when you separated them it would still appear full. I stacked 12 sheets on top of one another, kind of a pain to count individual pieces of tissue paper since it’s so fine, but I wanted to remain consistent.

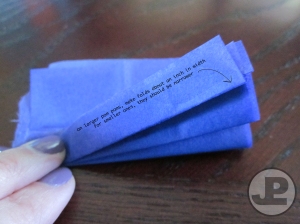
Start folding the paper from the narrower end, as pictured below. For my larger pom poms, I made a fold roughly every inch. For the smaller ones, I made the folds closer together. If you don’t know how to do an accordion fold, you start by folding the paper up by about an inch, flip the paper over so the fold is facing downward, and fold back by the same amount, flip paper over again, and so on. When you’re done, your folds should line up, and the paper should look like an accordion, or a fan.

Once you’ve finished folding, take whatever string you’re using, and tie a double knot in the center of your fan. You’ll want the knot to be pretty tight, but a little wiggle room is fine, and will make it a bit easier to loosen the pages from each other when you fan them out. I spaced my fans about 6 inches from each other. When you separate the paper to make your pom poms, they’ll appear closer together.

Then take a break and look over to make sure your cat isn’t doing anything weird.

Nothing unusual here...

Puffing out your pom poms is more time consuming than you’d think, since it’s also a delicate process. The time to do this is not half an hour before your guests come, just as an FYI. Starting from the outside, gently separate each layer of tissue paper, one at a time. You have 12 sheets, so you’ll want to pull 6 towards the top, and the others towards the bottom to create a bowl-shaped poof. Then separate the pages on the other side.

This doesn’t have to be done perfectly – but the more you separate the layers, the more poof you’ll have! Also, the sturdier your tissue paper, the easier this will be. If the paper rips, don’t sweat it – when it’s all puffed out you won’t even notice. This is a very forgiving project.

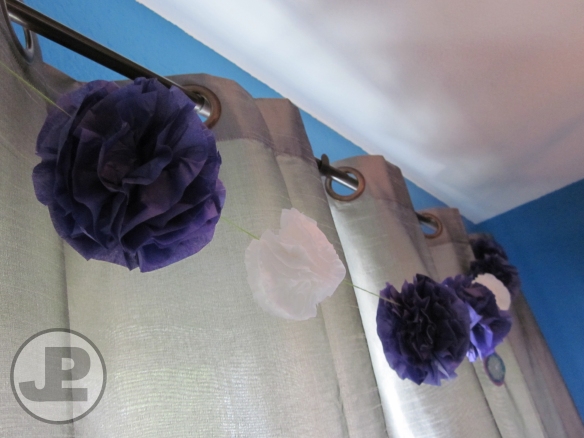
Then string your garlands wherever you want! I had this one hanging from a curtain rod, and another strung over my sliding door. I love the texture they added! Also, in case you’re wondering, I did, in fact, match the garlands (and other decorations) to the colors of my apartment. My entire apartment is actually that brightly colored, but the decor will be another topic for another day.

These easy decorations can brighten up any home, even if there isn’t a special occasion. You might even consider making larger pom poms and hanging them vertically from the ceiling. I’d love to see pictures if you do!