Personalized Notebook

I don’t know about you, but I love giving gifts with a personal touch. And the easiest way to do that is to buy something pre-made and enhance it with your own embellishments. I made a bunch of these as Christmas presents a few years ago. They’re an easy, fun, and relatively cheap way to give a personalized gift that people will cherish.

Recently, I found I needed a notebook to keep a collection of thoughts, instead of having randomly scribbled post-it notes everywhere. After having made these for my sister, cousins, and mom, I realized I should make one for myself! All you need is a notebook and a good variety of stickers. If you’re like me, you have a bin of stickers arranged by occasion so you can pick and choose as you please.

This isn’t really a step-by-step how-to, but rather an idea you can take and run with. It’s something that could easily make a wonderful gift for Mother’s Day or Easter, since they’re fast approaching, as well as a birthday for your favorite writer, musician, or teenager.

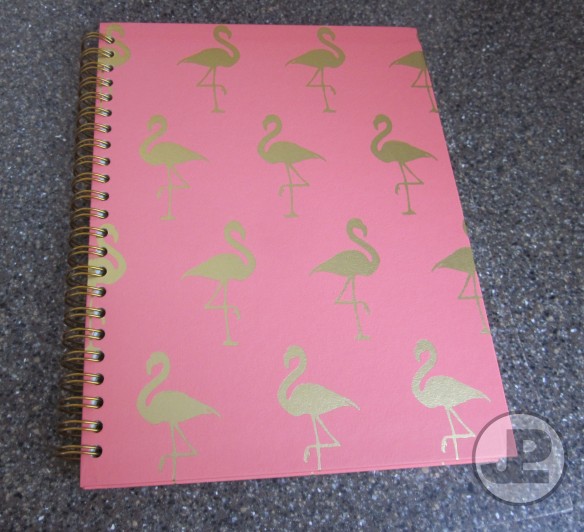
The first step is to get a good notebook. This is subjective, however I have some preferences. Leather/Moleskin is probably not your best bet, as I doubt stickers will adhere well, and you’ll want this to last! I prefer a thick, paper-like cover with a matte finish. That being said, if you just wanted to add a splash of personality to your school books, this would certainly work on your standard 1-3 subject notebook. For a gift, however, look in stores with “office/school supplies.” You’ll want a “journal” as opposed to a regular notebook, because frankly those come with the best patterns. I’ve found some great ones in both CVS and Staples, but this flamingo one was purchased at Target.

IMG_9608 IMG_9606

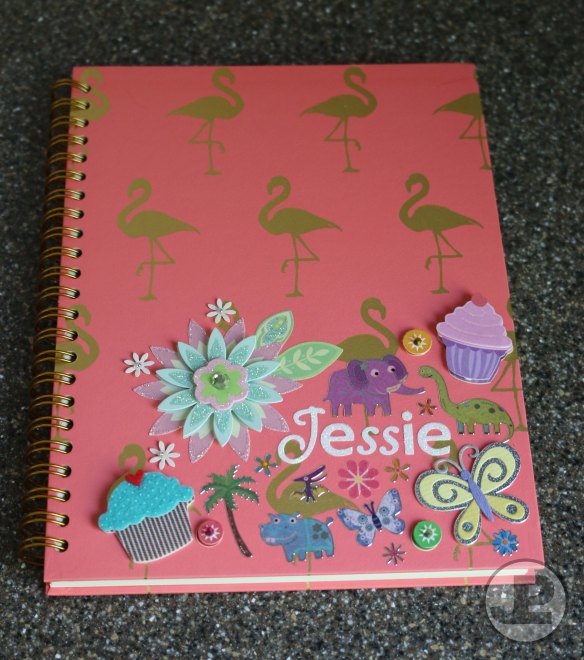
Then get decorating! I usually start off by putting the name on the notebook first. That way, you can build a border around it with the rest of the stickers. (or not! there are no rules!)

IMG_0675

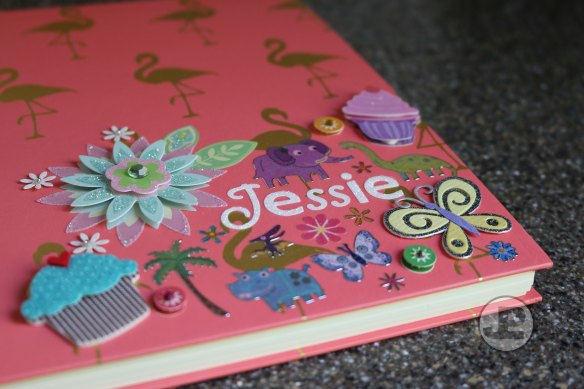
In my experience, I’ve found the coolest collages are created when I use a variety of stickers with different shapes, sizes, textures, colors, sheen (glitter, matted, shiny), and thicknesses. Play around to create depth, as it’s more visually interesting and will make your notebook look way more intricate and involved than it was to make. Beyond that, they sell stickers for almost anything you can think of – flowers, sports, hobbies, travel… There are virtually no limits to what you can use and how you can layer everything.

IMG_0678

The best part is with these stickers, while they’ll stay in place when you’re finished, they’re also easily moved before you’re done. I played around with placement of a few of these before settling on a spot. While ideally you’ll find the perfect home for each piece before committing to placement, the truth is that’s not how the creative process works. Once you have more pieces of the puzzle in, you might realize that some things just might look better elsewhere. There was originally another butterfly where the brontosaurus is. I just wasn’t feeling it in the end!

IMG_0674

This notebook has already been put to use, and it makes me smile every time I look at it. I have no doubt you’ll have the same reaction to your finished product, whether or not you’re the intended recipient.

Happy crafting!

the craftiest of surprises

My sister sent me a text asking, “What are the ‘pads of paper’ that you have on the customs page of this package you sent me?” I hadn’t wanted to ruin the surprise, but when customs get involved, customs go out the window, you know what I mean? Maybe not. I babble.

After finishing a fun joint crafts venture over the holidays, my sister had lamented to me that they just didn’t have good craft-supply stores in Berlin. Shortly after she left SoCal to head back to Europe, I started stockpiling some goodies for her.

While I am tooting my own horn a bit here, I’m also mentioning this as a suggestion for anyone who needs a gift for the crafter in his or her life. It is, after all, National Craft Month.

There was a crazy sticker sale at Michael’s, as well as cheap cute ones from Target, not to mention great deals on pads of paper. Since there are usually 2/3 sheets of each pattern, I delicately ripped out a page or two of each to send her, and kept the remainder for myself. And there was a handy container on sale to keep it all, well, contained… since my sis is short on space in her apartment. (Photos courtesy of my well-traveled sister.)

Craft Care Package 1

Final tally included tons of scrap-booking paper in varying shades, patterns, and weights, stickers and embellishments – like different glittery alphabet sets, flowers, animals, self-adhering rhinestones and pearls – and a set of glitter glue pens (can’t live without them!). Now she can make all the cards and picture frames and collages she wants!

Craft Care Package 2


Point is, if anyone is looking for something to get me this National Craft Month, or looking for some project starters of their own, see above!


Scrapbook Paper Flowers

I was totally inspired by Cally at Cally’s Creations for this next project. When I saw her post about the 3D flowers, I knew I wanted to create some of my own. Following her basic guidelines, I put my own spin on these, and it resulted in some fabulous decorations for both my walls and curtains!

You’ll need:

  • Paper – scrapbooking, tissue, card stock, construction, printer, etc
  • rhinestones
  • glue
  • scissors
  • small or medium safety pins (if you want to hang them on curtains)

Basically, you want to cut out concentric circles of differing sizes and glue them together in the middle. Callie used adorable brass fasteners (split pins) with flowers to join hers together, but I used some glue and a plastic rhinestone to finish mine. I also found I didn’t have the patience to cut out more than three layers for each flower, so I didn’t!

The only rules I had for these flowers were that they be comprised of purple and teal layers to match my living room. I actually didn’t even pay attention to the hues and whether they went with each other, and the colors still look fantastic together. I used both plain and patterned scrap-booking paper, as well as some patterned tissue paper I had leftover from my garlands.

If you’re going to do more than 3 petal layers, I’d recommend making your outside circle larger to start with. I think mine averaged around 3″ in circumference, but I didn’t measure. To more precisely cut out circles you can fold paper in half and then cut out a half-circle, but I liked the organic, imperfect shapes I managed to freehand with the scissors. I then crinkled some of the paper, per Cally’s instruction, to give it more texture.

As you can already see, I added my own flare to some of the flowers by cutting out triangles to form separate “petals.” This is easily done by folding your flower in half, and snipping two small lines to make a triangle. Remove the cut paper.

While I wanted some wall decorations for my walls (I used painter’s tape to apply it), I also wanted to put some up on my curtains, so I got the idea to glue a safety pin to the backs of some flowers. This was really easy to do – just make sure that you don’t glue down the side of the pin that opens! I took about a one inch strip of scrap-booking paper, placed the pin in the middle, then added 2 dabs of glue – one on either side. (As my kindergarten teacher taught me, a little dab’ll do ya.) Then I placed the strip onto the back of one of the flowers. Let it dry, and voila!

These came out awesome, and I’m already planning to repurpose them by combining them into some bigger art project. I’ll post the updates whenever that happens. For now, check out some of my gorgeous results!

And here, you can see the safety pin idea totally worked! (They’re still hanging on my curtains because they compliment the dining room so well.)

Have you done a project like this one? How did it turn out?

Paper Pom-Pom Garlands

I’ve been accused of random things in my life, but most often I’m lambasted for downplaying my creativity. I’ve been told that when I shrug off something that I’ve created as no big deal, it’s bizarre to other people, because not everyone’s brains work like mine. (Though to me, it wasn’t a big deal!) I think this is part of why I decided to start this blog – to show off a bit of my artwork. Don’t get me wrong, I know I have a knack for the colorful and crafty, but I have difficulty understanding how to walk the line between acknowledging my talent vs. being an unbearable braggart. (Aren’t I amazing?)

So apparently, when I casually told my mother I’d created some decorations for my birthday party, she didn’t understand that I’d handmade these garlands, as well as some other adorable adornments for my living room. I’d seen decorations like these at a party store, and had bought them on a previous occasion, but as with most things artsy, I thought, “I can make that.” So I did.

Do you remember making flowers out of tissue paper as a kid? I’m not talking the detailed flowers I learned to make using stencils from a kit my mom got me in college (does she know me or what?), but rather the accordion-folded tissue paper squares that you fluff out and attach to a pipe cleaner to make a flower… If not, that’ll be another demo for another day 🙂 I applied the same principal here – stack a bunch of papers, fold them accordion style, then fan and fluff them so you have nice pretty puffs strung together on embroidery floss (in this case).

You’ll need:

  • tissue paper
  • scissors
  • embroidery floss or any kind of string

Start off by cutting your tissue paper to whatever sized rectangles you like. I folded and cut my sheets of tissue paper in half as many times as I could until my rectangles were about 5×7. With different colors, because I do love diversity, I made my rectangles smaller – about 3×5. I didn’t measure these, so don’t stress over it. You just want all your rectangles of the same color for the same pom pom to be roughly the same size.

I decided that 12 was the magic number to where there weren’t too many sheets of paper to contend with, but enough that when you separated them it would still appear full. I stacked 12 sheets on top of one another, kind of a pain to count individual pieces of tissue paper since it’s so fine, but I wanted to remain consistent.

Start folding the paper from the narrower end, as pictured below. For my larger pom poms, I made a fold roughly every inch. For the smaller ones, I made the folds closer together. If you don’t know how to do an accordion fold, you start by folding the paper up by about an inch, flip the paper over so the fold is facing downward, and fold back by the same amount, flip paper over again, and so on. When you’re done, your folds should line up, and the paper should look like an accordion, or a fan.

Once you’ve finished folding, take whatever string you’re using, and tie a double knot in the center of your fan. You’ll want the knot to be pretty tight, but a little wiggle room is fine, and will make it a bit easier to loosen the pages from each other when you fan them out. I spaced my fans about 6 inches from each other. When you separate the paper to make your pom poms, they’ll appear closer together.

Then take a break and look over to make sure your cat isn’t doing anything weird.

Nothing unusual here...

Puffing out your pom poms is more time consuming than you’d think, since it’s also a delicate process. The time to do this is not half an hour before your guests come, just as an FYI. Starting from the outside, gently separate each layer of tissue paper, one at a time. You have 12 sheets, so you’ll want to pull 6 towards the top, and the others towards the bottom to create a bowl-shaped poof. Then separate the pages on the other side.

This doesn’t have to be done perfectly – but the more you separate the layers, the more poof you’ll have! Also, the sturdier your tissue paper, the easier this will be. If the paper rips, don’t sweat it – when it’s all puffed out you won’t even notice. This is a very forgiving project.

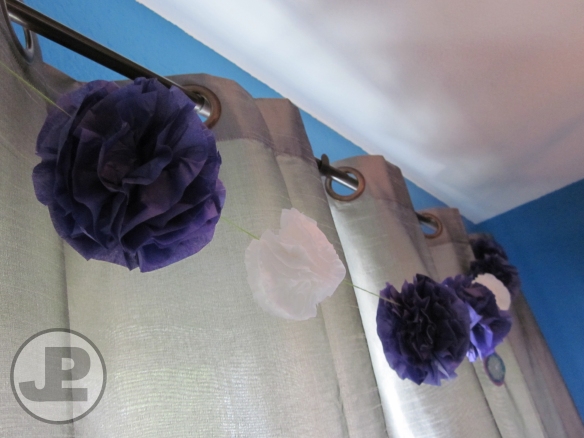
Then string your garlands wherever you want! I had this one hanging from a curtain rod, and another strung over my sliding door. I love the texture they added! Also, in case you’re wondering, I did, in fact, match the garlands (and other decorations) to the colors of my apartment. My entire apartment is actually that brightly colored, but the decor will be another topic for another day.

These easy decorations can brighten up any home, even if there isn’t a special occasion. You might even consider making larger pom poms and hanging them vertically from the ceiling. I’d love to see pictures if you do!

Oh, hello there!

Some of you may already know me as that girl who putters around the kitchen, but my first love will always be arts and crafts. In the spirit of my recent, burgeoning creativity (thank you, Pinterest), I have decided to start a separate blog to highlight some of my non-baking creations. Basically, I wanted a forum to show off all the fun stuff I can make with other mediums.

My love of arts and crafts has been around since as long as I can remember. I’m pretty sure that in every home I’ve lived in since childhood, there is a blue stain on the carpet (or couch…) from some rogue acrylic paint. (My current apartment is no exception.) On this blog, I will showcase all different kinds of artwork, from painted nails to painted canvases, my extensive collection of stickers and glitter, and anything else I find pretty. While some entries will be pictures of pieces I’ve made in the past, I also anticipate posting some how-tos of all the projects I’ve tucked away and have yet to make.

For my first ever post on They Call Me Crafty, I have chosen to display the two paintings below – the oldest paintings of mine that I have in my home. I kind of thought the first was likely painted with tempera or acrylic on a 9 x 12″ canvas board, but it actually looks a lot like water color. I can’t remember, and can’t really tell. Anyway, it’s a painting of a house I grew up in, painted in an art class I took at a local community college probably when I was 8 or 9. We moved in 1993, so all I know is that the painting has to be from before then, but isn’t dated.

The second painting is acrylic on a 9 x 12″ canvas board, and was created while I was at summer camp, and is dated 1995. I was, and still am, pretty proud of the job I did with shading.

I look forward to sharing more of my artistic endeavors with you, both past and present. Thanks for joining me on what promises to be a sometimes sparkly, but always colorful adventure.